Showing posts with label Tutorial. Show all posts

Sunday, 5 October 2014

How to download YouTube videos easily using ClipConverter | With Pictures

How to download YouTube videos easily using ClipConverter | With Pictures

There are numerous ways to download YouTube videos but if we compare all of them then ClipConverter will win because it always provides high quality videos to download including 720p and even 1080p quality. You know about Savefrom.net ? No? It is same as ClipConverter website but sometimes it doesn't work. It shows errors like 'Download Link is not availabe' even if you have valid YouTube link. Also it doesn't gives you HD quality link and serve a downloader extension for computer but the extension sadly doesn't works. So, in ClipConverter there are absolutely no issues. Anyone can download YouTube videos  easily from this site and I will show you how to do that. Proceed below..

How to download YouTube videos easily using ClipConverter

1. Visit Youtube site.

How to download YouTube videos easily using ClipConverter | With Pictures


2. Search for the video you want.


How to download YouTube videos easily using ClipConverter | With Pictures


3. Right click and copy link address.


How to download YouTube videos easily using ClipConverter | With Pictures


4. Visit ClipConverter.cc website.


How to download YouTube videos easily using ClipConverter | With Pictures


5. Paste the copied  URL in the black bar and click 'Continue' button.


How to download YouTube videos easily using ClipConverter | With Pictures


6. You will see the above image. Choose the quality you want and press 'Start' button.


How to download YouTube videos easily using ClipConverter | With Pictures

7. You will some proccesses goin' on. Wait here.


How to download YouTube videos easily using ClipConverter | With Pictures


8. And within moments you will see the below given. Click 'Download' and download it any download manager. I recommend IDM.

How to download YouTube videos easily using ClipConverter | With Pictures


Hope you would like this post. If you got some error then feel free to comment below. Thanks for reading. :)

read more

Thursday, 2 October 2014

How to make Google Chrome fast | With Pictures


As we all know that Google Chrome is the fastest browser in the world for Personal Computers but some people prefer Mozilla Firefox. So, if you are a Firefox user then you must look why most of the people prefer Chrome. It is because of its highly tweaked JavaScript processing speed, supports 3rd party extensions and also provide 15 GB cloud storage via Google Drive. 
          Oh, sorry. I am writing this post on making Google Chrome fast and I'm favoring it better than Firefox. :) Nevertheless, we will see below about it.

If you are using the latest version of Google Chrome i.e. 37.0.2062.124 then you must have experienced slow opening of Google Chrome(application) because of inbuilt Google homepage on first screen. This makes Google Chromes's opening slow. This homepage was not their in earlier versions. So to remove this issue of slow launching of Chrome, we must downgrade to the earlier version of Chrome. In earlier version of Chrome, Chrome Store won't let you download extensions but don't worry, you can download the extension.crx file and install them manually. So, if you wanna make Chrome fast then read below.

How to make Google Chrome fast

1. First, if you have Chrome installed then uninstall it via Control Panel. You know na, how to uninstall it? I know, you know. Just kidding :)

2. Now download old version of Chrome from my Google Drive account - Google Chrome 27

3. Install it and open it. You will see like this.


4. If you have user account linked with Google Chrome then delete it or it will show an error. Delete that user account in settings as I shown below.


5. Now, again sign-in with your Gmail account to get you bookmarks and history back.

How to disable auto-update of Chrome

If you are using the older version then Chrome has ability of updating on its own without your permission. Then again it will become slow if it gets to the new version. So, we must disable the auto-update function.

1. Download GoogleUpdate.adm file.

2. Type gpedit.msc in search. It varies in Windows 7 and 8.1. I'm on Windows 8.1


3. Right click on 'Administrative Templates' and click on 'Add/Remove Templates' option.


4.You will get this. Click on 'Add' button and select the GoogleUpdate.adm file which you downloaded earlier.


5. Close it. Expand 'Administrative Templates'. Expand all until you see Google Chrome. Follow these sequence.

Classic Administrative Templates > Google > Google Update > Application.


6. Click on 'Google Chrome' and Right click on 'Update Policy Override' and 'Edit'.


7. A window will open. Choose 'Disabled' to disable auto-update of Chrome.


Woah !! Long story right. It ain't finished yet. Part 2's link is below.

Part 1   |   Part 2
read more

How to install Google Chrome extensions manually | With Pictures


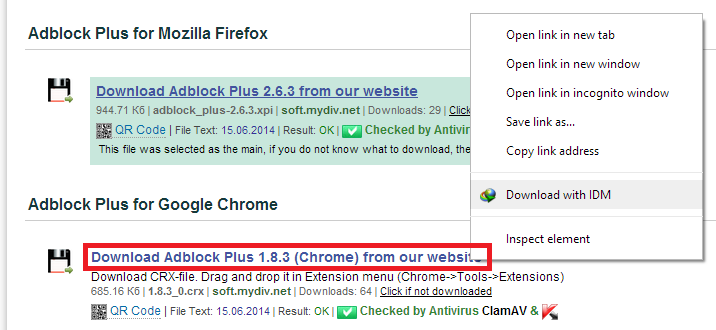
1. First of all,search for your required Google Chrome extension like this. Let's take Adblock Plus as an example.

2. If you got the download link then download it via a IDM not by Chrome itself.


3. Now, you have the downloaded extension. Copy this chrome://extensions/ and paste in address bar. You will see some or no extensions.


4. Drag the downloaded extension and drop in Google Chrome's extension page to install it.


5. You will see a pop-up. Click on 'Add'.


6. Wallah!!! :) You will see that extension is installed.


If you haven't read the 1st post then click this - How to make Google Chrome fast | With Pictures

Hope you will like this post as it involved a lot of hard work and patience to write on such an obnoxious topic. By the way, Thanks for reading.. :)
read more

Tuesday, 30 September 2014

How to play PSP Games on an Android Phone using PPSSPP | With Pictures

How to play PSP Games on an Android Phone using PPSSPP | With Pictures

In this tutorial, I'm gonna show you how to play PSP games on an Android smartphone. First of all, let me tell you that all PSP games are not supported so don't blame me if you lost you internet data while downloading PSP games. The games will lag depending upon you smartphone's hardware specifications. 

Minimum Requirements are :-
  • Android Smartphone with Quad-core CPU, Mali-400 MP GPU and 1 GB RAM
  • PSP Game's ISO or CSO File - Download
  • PPSSPP.apk file - Download
So let's begin ..

1. First of all download and install PPSSPP.apk on your android phone.

2. Copy the downloaded game's .iso or.cso file on SD Card

How to play PSP Games on an Android Phone using PPSSPP | With Pictures

3. Now, open PPSSPP on you phone.

How to play PSP Games on an Android Phone using PPSSPP | With Pictures


4. Scroll down, you will see game's icon

How to play PSP Games on an Android Phone using PPSSPP | With Pictures


5. Click to play that game.

How to play PSP Games on an Android Phone using PPSSPP | With Pictures

How to play PSP Games on an Android Phone using PPSSPP | With Pictures

How to play PSP Games on an Android Phone using PPSSPP | With Pictures

Here are my graphics setting to play WWE 2K14 without lag

How to play PSP Games on an Android Phone using PPSSPP | With Pictures

How to play PSP Games on an Android Phone using PPSSPP | With Pictures

How to play PSP Games on an Android Phone using PPSSPP | With Pictures

How to play PSP Games on an Android Phone using PPSSPP | With Pictures

Hope you will like this post. If anything went wrong, feel free to comment here. We will reply as soon as possible. Thanks for reading..


read more

Monday, 29 September 2014

How to untag yourself from a Facebook photo and stop unwanted notifications | With Pictures

How to untag yourself from a Facebook photo and stop unwanted notifications | With Pictures

Everyday we use Facebook to stay connected with our family and colleagues but some people want to show off their stuff on Facebook and to do that they simply tag their friends. It is favorable for the person who tagged but the people who got tagged in the picture will suffer from unwanted notifications even when a person like that photo or comment. This could be a pain in the ass for the people who got tagged. So, to stop this kind of bullshit you need to untag yourself from that photo. That's why I've made this post to save you from spammers who tag people everytime for a few handful of likes. I've made this tutorial for all platforms like PC, Facebook mobile site and Facebook Application. Let's see how it is done.

On Facebook mobile site

1. First of all visit the photo in which you are tagged.

How to untag yourself from a Facebook photo and stop unwanted notifications | With Pictures


2. Scroll down and click on 'Remove'.

How to untag yourself from a Facebook photo and stop unwanted notifications | With Pictures

3. Tada !!! :) Now, you won't get useless notifications..

On Facebook Android App

1. Visit the photo as same in FB mobile site and click on ' Download Arrow (v)' on the top right of photo.

How to untag yourself from a Facebook photo and stop unwanted notifications | With Pictures


2. You will see two options. Click on 'Remove Tag'.

How to untag yourself from a Facebook photo and stop unwanted notifications | With Pictures


3. Now, it will show a confirmation pop-up. Click on 'Confirm'.

How to untag yourself from a Facebook photo and stop unwanted notifications | With Pictures

4. Done. Now, no crappy junk on your notification page. :)

On Facebook desktop site

1. Visit the photo in which you are tagged and click on 'Options' and then 'Remove Tag'

How to untag yourself from a Facebook photo and stop unwanted notifications | With Pictures


2. You will see a pop-up. Click on 'Okay' button.


How to untag yourself from a Facebook photo and stop unwanted notifications | With Pictures


2. Done. Now, you won't be pissed by shitty notifications.


Uff. It was hard to write this post but still I wrote. I hope you will like it. Please comment below if you have any queries. We are always there to help. :)  Thank You for reading. Now signing off. Stay tuned for my next update. Till then Sayo Nara (Bye Bye) :D
read more

How to Bypass Adfly, Adfocus and Linkbucks URLs easily | With Pictures

How to Bypass Adfly, Adfocus and Linkbucks URLs easily | With Pictures

Everyday we see that most of the download links come with adf.ly, adfoc.us, linkbucks and many more prefixes. These sites are used by bloggers to earn money. You just have to 'Skip Ad' after 5 seconds and this will fill the wallet of bloggers :) but very slowly :( . But if your ISP has blocked these sites then opening them could be a pain in the ass :) 

So in this post, I'm gonna show you a simple trick or whatever you say to bypass these shitty sites easily. 

1. When you see a link like this - adf.ly/mgfkp or http://adfoc.us/x1 then you feel very angry to wait 5 seconds for each link. But don't worry, they won't bother you anymore. Simply copy the link.

How to Bypass Adfly, Adfocus and Linkbucks URLs easily | With Pictures


2. Further visit BypassShortUrl.com

How to Bypass Adfly, Adfocus and Linkbucks URLs easily | With Pictures


3. Paste the link and remove http:// from the link else it will give an error. 

How to Bypass Adfly, Adfocus and Linkbucks URLs easily | With Pictures

4. Click 'Expand' button and wallah, you will get the download link.. :)

How to Bypass Adfly, Adfocus and Linkbucks URLs easily | With Pictures

Hope, you will like this post. If any queries then ask in comment section given below. We will reply as soon as possible. Also share this post with your friends. Haven't you heard that saying "Sharing is Caring" :)

read more

3G HACK WORLD